The error " USB Device Not Recognized " is one of the common errors, often appearing when you connect a USB drive on Windows XP, Windows 7, 8 and even Windows 10. In the article below, WebTech360 will introduce and guide you through some solutions to quickly fix this " USB Device Not Recognized " error.
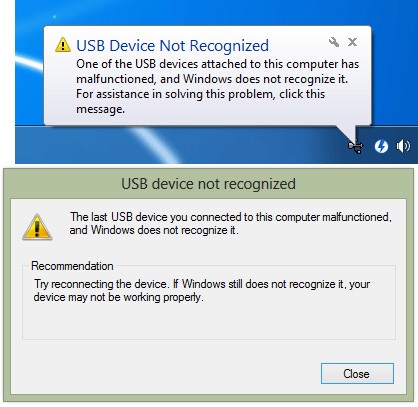
USB device not recognized error message on Windows 7 and Windows 10
Table of Contents
Causes of USB Device Not Recognized error
When a user connects a USB to his system and the error USB Device Not Recognized appears, it means that the contents of the USB are not recognized. This does not mean that the USB is damaged and cannot be used further. The cause of such an error may be due to some settings or permissions granted to the hardware or software in the system and can be easily fixed.
Different reasons that cause USB Device Not Recognized error include:
- USB cannot be fully loaded into the system.
- USB can contain any malicious file; therefore, the system does not read it.
- Due to low system battery, Root hub settings may not recognize USB.
- There may be any errors in the driver that need to be updated.
- Windows may need to be updated with the latest patches and fixes.
1. Restart your Windows computer
In many cases, the simplest way to fix errors on Windows 10 is to restart your Windows computer. Note that before restarting your Windows computer, save all documents you are working on and close all open application programs.
After the boot process is complete, connect the USB drive to your computer.
2. Disconnect the computer power and reconnect after 15 minutes
This solution may sound silly but in some cases it can help you fix the USB device is not recognized error.
To disconnect the computer power, the first thing to do is to turn off your computer, then unplug the power outlet. Wait about 10 to 15 minutes, then plug the power back in, turn on your computer and reconnect the USB drive to see if the error is fixed.
3. Connect the USB drive to a different port
This is only a temporary solution. If you get the "USB device not recognized" error while connecting your USB drive, you can connect your USB drive to a different port to see if the error is resolved.
4. Disable Fast Startup feature on Windows 8, 8.1 and 10
To disable Fast Startup on Windows 8, 8.1 and 10, follow the steps here .
5. Update USB driver
Step 1:
Open Device Manager by right-clicking the Start button and then clicking Device Manager .
Step 2:
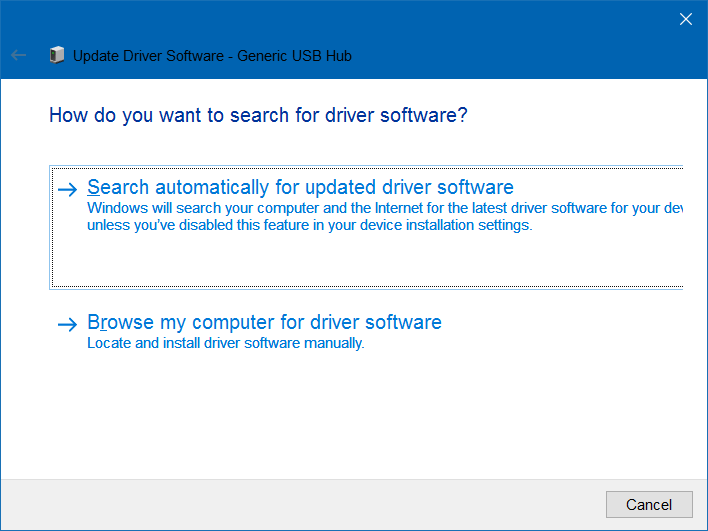
Expand Universal Serial Bus and check for any unknown USB devices. If you see an unknown USB device, right-click it, click Update Driver Software , and then click Search automatically for updated driver software to have Windows 10 automatically download and install the latest driver version.
You can also refer to the article:
6. Update Generic USB Hub driver(s)
Step 1:
Open Device Manager by right-clicking the Start button and selecting Device Manager. Then expand Universal Serial Bus to see if there are one or more Generic USB Hubs.
Step 2:
Right-click on the first Generic USB Hub line (if there are multiple Generic USB Hubs), then click Update Driver Software => Browse my computer for driver software => Let me pick from a list of device drivers on my computer , select Generic USB Hub and then click Next .
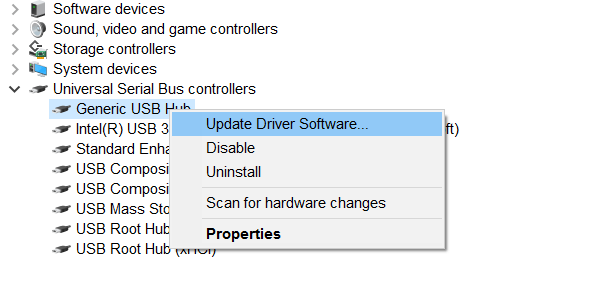
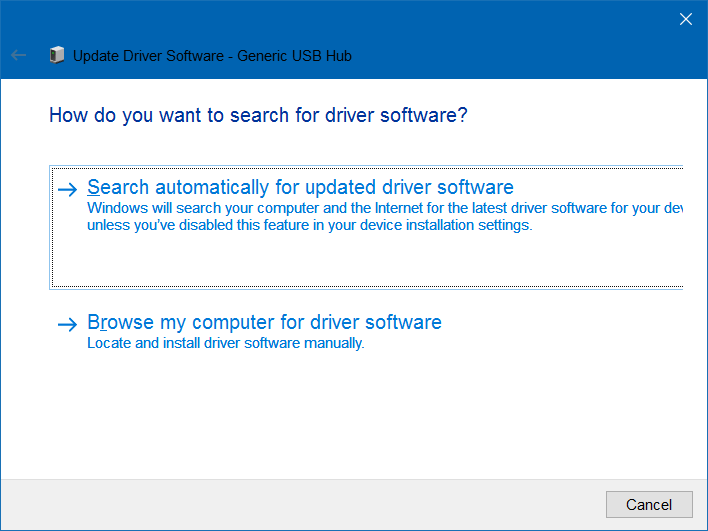
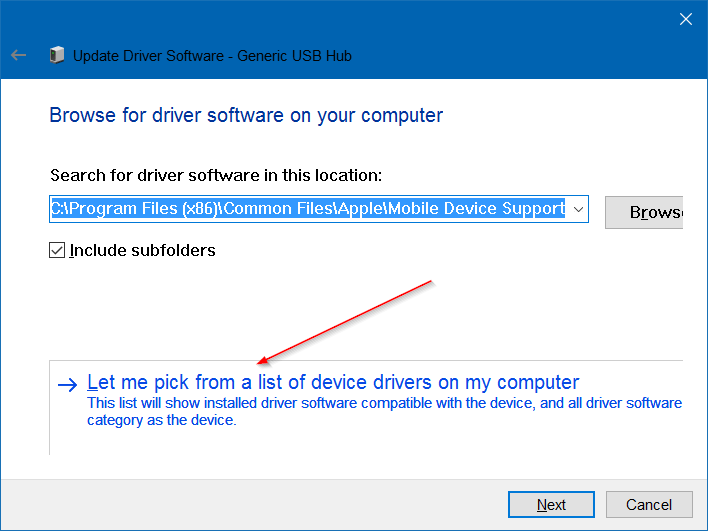
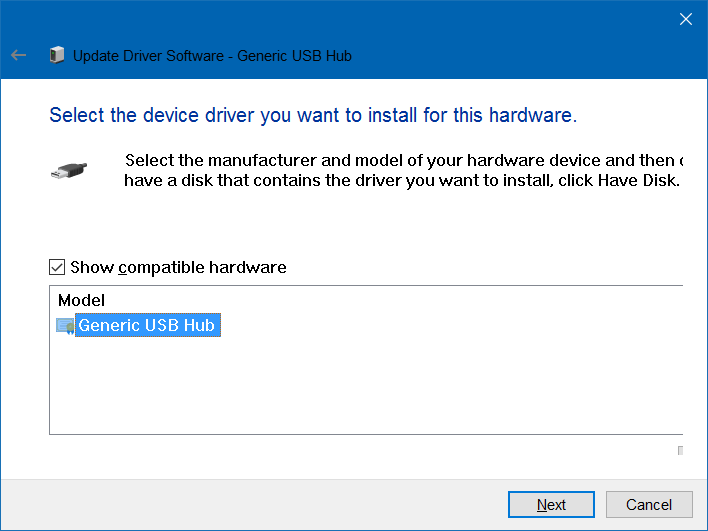
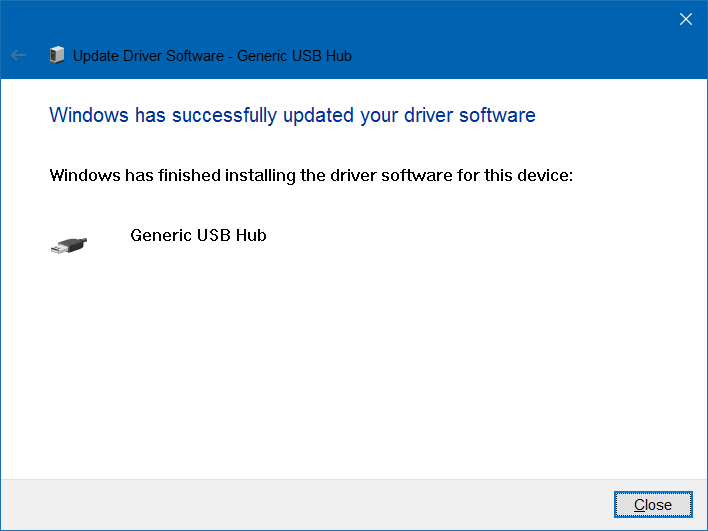
Wait until the message “Windows has successfully updated your driver software” appears on the screen.
7. Reinstall USB driver
Note:
Before reinstalling the USB driver, you should create a system restore point or image backup to prevent errors during the driver installation process on your Windows 10 computer.
- Open Device Manager. To do this, follow the steps below:
Press the Windows + R key combination to open the Run command window.
On the Run command window, type devmgmt.msc and press Enter.
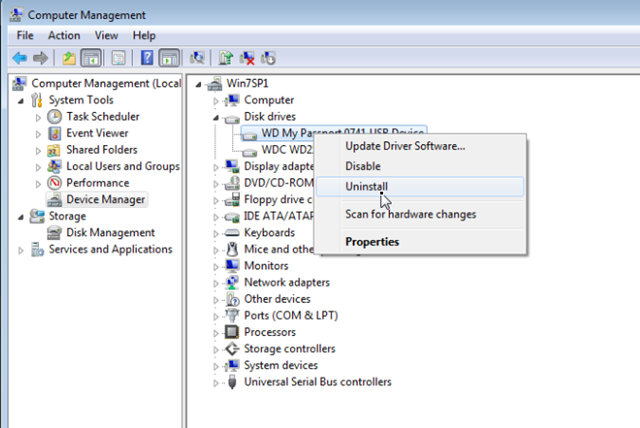
- Next, in the Device Manager window, expand the Disk Drives section .
Right-click External USB 3.0 Disk , then select Uninstall .
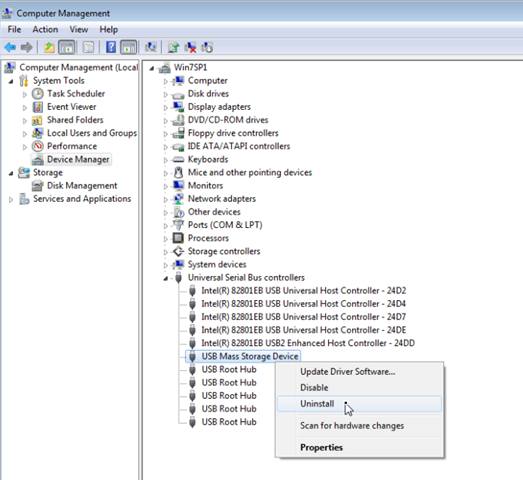
- Next expand the Universal Serial Bus Controllers section .
Right-click USB Mass Storage Device and select Uninstall . You can also uninstall any Unknown USB Device from this list.
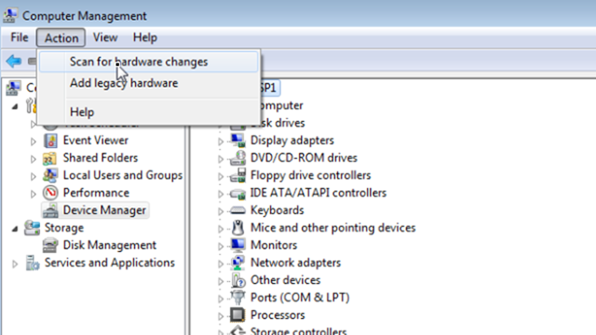
- From the Action Menu, select Scan for hardware changes .
- After the scan is finished, open Windows Explorer and find your connected USB drive.
If the Not Recognized error still occurs, then you open Device manager again and update the USB driver. To do this:
- Expand Disk Driver.
Right-click your USB 3.0 drive, then select Update Driver Software .
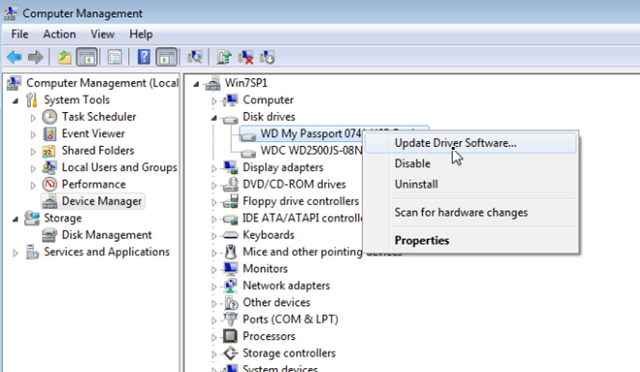
Wait for Windows to automatically find the latest driver version for your USB 3.0.
- Do the same to update the driver for USB Mass Storage Device .
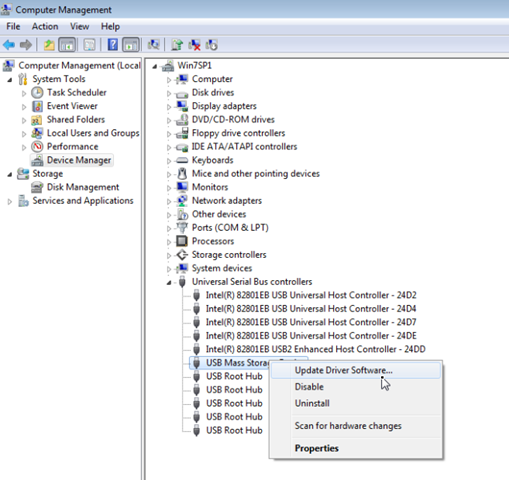
Once done, check if your USB 3.0 is recognized.
8. Restore Windows to its previous working state
If your USB 3.0 drive was previously recognized, then you can restore your computer to its previous working state to fix the error.
Restore Windows 8 or Windows 8.1 to a previous working state:
Access Windows 8 System Restore mode:
1. Move your mouse cursor to the lower right corner of the screen to open Settings.
2. Hold down the Shift key , then click the Power button.
3. Select Restart .
4. When your computer restarts, click on the Troubleshoot option.
5. On the Troubleshoot window, click Advanced options .
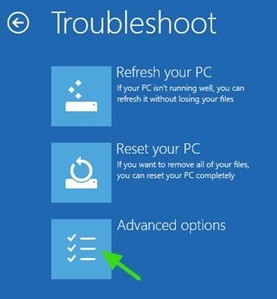
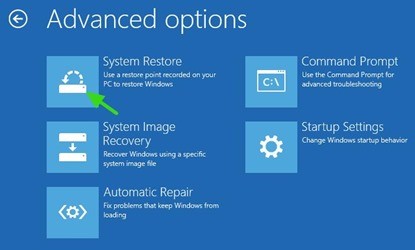
6. On the Advanced options window, click System Restore .
7. Select an account with Admin rights.
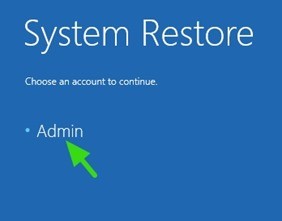
8. Enter your account password, then click Continue.
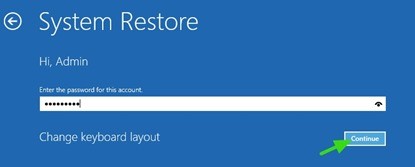
9. On the System Restore screen, click Next.
10. Select a previous restore point, then click Next .
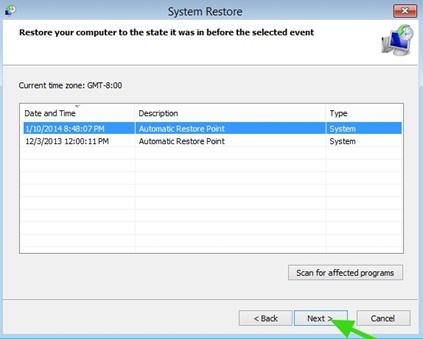
11. Confirm your selection and click Finish.
12. Wait until your computer is restored to the restore point you selected.
13. Once the system restore process is complete, restart your computer and you're done.
9. Use support software
Use genuine Microsoft tools and software:
- Hardware and Device Troubleshooter : open it by following the path Control Panel > All Control Panel Items > Troubleshooting :
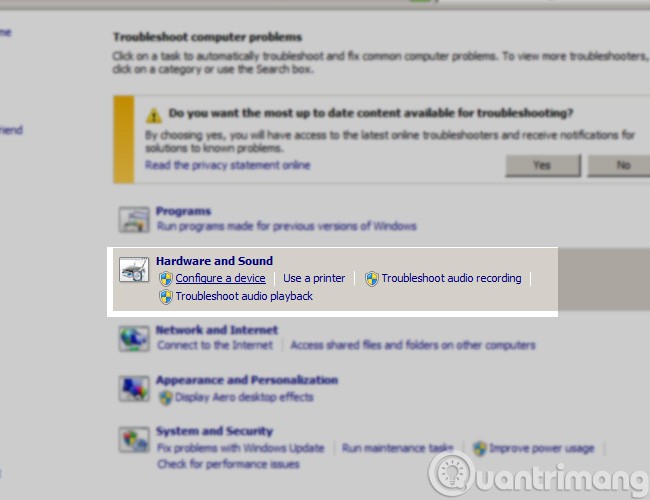
Click Configure a device
These 2 tools will automatically find and fix USB connection errors for you.
Note:
If you are using one of the following Windows versions:
- Windows 8
- Windows 8.1
- Windows Server 2012 R2
- Windows Server 2012
It is also very possible that you will encounter the USB device not recognized error as above. The main reason is that after you remove the USB using the Safely Remove USB feature (right-click on the USB icon in the system tray > Eject Mass Storage ), the USB port will be switched to Disable mode . To fix this, download and install the HotFix version below from Microsoft:
Frequently Asked Questions
1. How to reset USB port?
It is possible that your hardware is working fine, but the USB port is having some issues, so it is best to use other ports on your system. If you want, you can reset the USB port using the steps mentioned below.
- Right-click on the Windows button and select the "Device Manager" option.
- Click on the “Universal Serial Bus controller” option .
- A list of options for different ports will be available.
- Click on the available "Uninstall" option .
- Now restart your system and then Windows will reinstall the driver on your system.
2. How to check if USB device is working?
Some USBs come with a small LED light that will blink when the drive is connected to the system and is in use. But if your USB doesn’t have an LED light, then you can follow the steps mentioned below.
- Right-click on the Windows button and then click “Device Manager” .
- Click ''Universal Serial Bus controller'' .
- Click on the port settings that the USB is connected to.
- From the list of options, click Scan for hardware changes .
- Check the USB Device option to see if it works.
Hopefully the above steps will help you fix the USB Device Not Recognize error on Windows. The above method can be applied to USB drives, external hard drives, USB mice... in short, almost all devices connected via USB ports.
Good luck!
See more articles below:
